


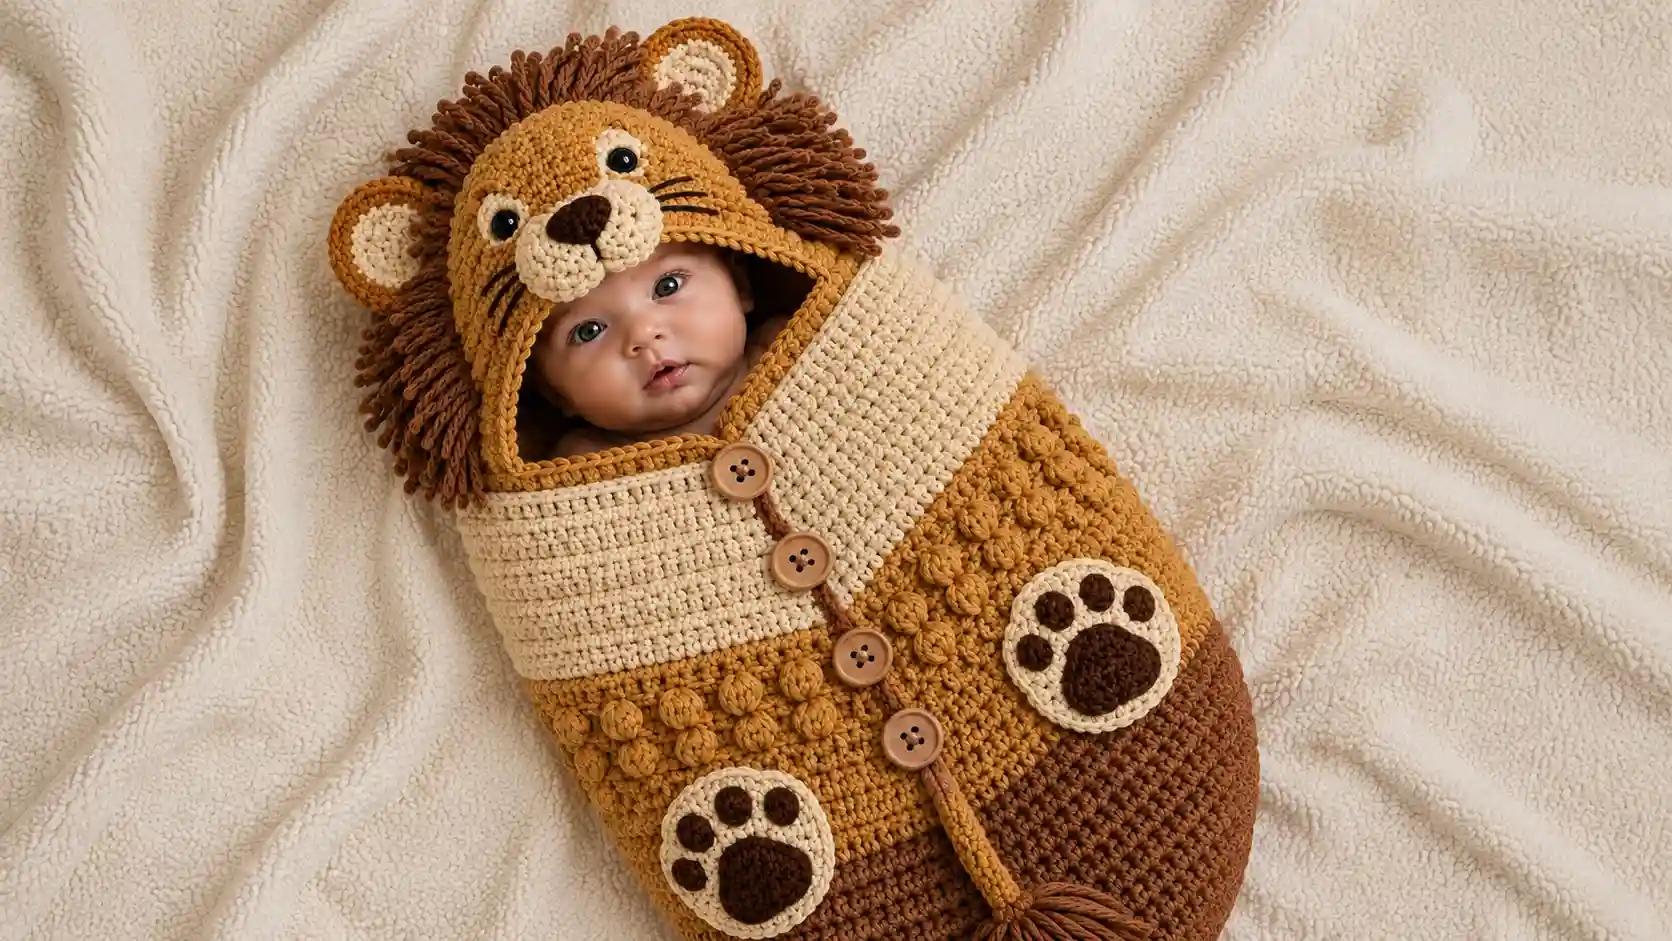
A baby lion cocoon is one of those handmade gifts that turns every newborn photo shoot into something unforgettable. This free crochet baby lion cocoon pattern gives you the complete construction from the rounded oval base to the lion-faced hood, including a three-color body with a bobble stitch midsection, a wooden button front band, two applique paw prints, a yarn tassel tail, and a full hooded lion head with loop stitch mane, rounded ears, cream muzzle, and embroidered whisker details. Every piece is designed to match the reference photo exactly.
The cocoon fits a newborn baby from 0 to 3 months with a finished length of approximately 50cm (20 inches) and a width of approximately 24cm (9.5 inches). Every technique is explained in full below. Work the body and hood in separate sessions as each requires focused construction, and do not skip the gauge swatch since sizing matters significantly for a wearable baby item.
Materials Needed
Yarn: Worsted weight (4) machine-washable yarn in the following colors. Choose a soft, hypoallergenic yarn for all baby-contact surfaces.
Golden amber (main color): approximately 250g / 8.8oz. This is the primary cocoon color for the midsection and the hood.
Dark chocolate brown: approximately 180g / 6.3oz. Used for the lower cocoon section, the mane loop stitch, and the tail tassel.
Cream or off-white: approximately 120g / 4.2oz. Used for the upper cocoon section, muzzle, and inner ears.
Orange: approximately 5g for the carrot-style nose if crocheted, or orange embroidery floss if embroidered.
Hook: 5.0mm (US H/8) for all main pieces. 4.0mm (US G/6) for the nose and small face details.
Additional supplies: Five large wooden buttons approximately 2.5cm (1 inch) diameter. Tapestry needle. Two 12mm black safety eyes. Polyfill stuffing for the lion muzzle and nose detail. Stitch markers (at least 4). Scissors. Straight pins for positioning appliques. Black embroidery floss for whisker lines. Pink embroidery floss for cheek dots.
Important: Never use safety eyes in a baby item that will be used for unsupervised sleep. For a sleeping cocoon, embroider all eyes using black yarn satin stitch instead.
Finished Size
Newborn (0 to 3 months)
Cocoon body length: approximately 50cm (20 inches) from oval base to neck edge. Cocoon body width at widest: approximately 24cm (9.5 inches). Hood circumference at face opening: approximately 36cm (14 inches). Hood height: approximately 13cm (5 inches).
Skill Level
Intermediate
The body uses basic hdc rounds, bobble stitch, and color changes. The hood uses standard decrease shaping. The loop stitch mane requires practice on a small swatch before starting. Estimated time: 12 to 18 hours across several sessions.
Gauge
13 hdc x 10 rows = 10cm x 10cm (4 x 4 inches) on a 5.0mm hook.
Gauge is essential for this pattern. A cocoon that is even 2cm too narrow will not fit a newborn comfortably. Make a 15cm x 15cm swatch, wash it once, dry flat, and measure before beginning.
Abbreviations (US Terms)
MR — Magic ring
ch — Chain
sl st — Slip stitch
sc — Single crochet
hdc — Half double crochet
dc — Double crochet
inc — Increase: 2 hdc in the same stitch
dec — Hdc decrease: yarn over, insert in next st, pull up loop, yarn over, insert in following st, pull up loop, yarn over and pull through all 5 loops
BLO — Back loop only
rnd — Round
rep — Repeat
st(s) — Stitch(es)
[X] — Stitch count at end of round or row
bobble — (Yarn over, insert hook, pull up loop, yarn over, pull through 2 loops) x4 in same st, yarn over and pull through all 5 loops on hook
loop st — Loop stitch: insert hook into stitch, wrap yarn over index finger to form a loop approximately 5cm (2 inches) long, catch both yarn strands coming off the finger with the hook, pull through the stitch, remove finger, yarn over and pull through remaining 2 loops on hook. The loop sits on the outside (WS) of the work.
Pattern Notes
Color sections in the body: The cocoon body has three color zones worked from the bottom upward. Dark brown covers the lower third. Golden amber covers the middle with bobble texture. Cream covers the upper section and creates the shoulder yoke.
Bobble stitch notes: The bobble stitch is worked on RS rounds only, alternating with plain even rounds between each bobble round. Bobbles always push to the outside (right side) of the work automatically as you complete each one. If your bobbles are appearing on the inside, you are working on the WS. Turn the piece inside out and continue.
Button band: The front button opening is worked as a separate flat strip and sewn to the center front of the finished cocoon body. This construction gives a cleaner result than working a front opening into the body rounds directly.
Mane loop stitch: The lion mane is worked around the face opening of the hood using loop stitch. The loops fall to the RS (outside) of the hood. Work a practice row of 15 loop stitches on a scrap piece before beginning the mane section.
Paw print construction: Each paw print is a cream oval base with dark brown smaller toe pad circles sewn on top. The finished paw prints are approximately 9cm (3.5 inches) wide and are sewn to the lower front sides of the cocoon body.
Cocoon Body
Oval Base
Work in dark brown yarn.
Foundation chain: Ch 36.
Rnd 1: Hdc in 3rd ch from hook. Hdc in each of next 32 ch. 3 hdc in last ch. Now working back along the other side of the foundation chain: hdc in each of next 32 ch. 2 hdc in first ch. Join with sl st. Ch 2. [70 hdc]
Rnd 2: Inc in first st. Hdc 32. Inc 3 times. Hdc 32. Inc twice. Join. Ch 2. [76]
Rnd 3: Hdc. Inc. Hdc 32. (Hdc. Inc) 3 times. Hdc 32. Hdc. Inc. Join. Ch 2. [82]
Rnd 4: Hdc 2. Inc. Hdc 32. (Hdc 2. Inc) 3 times. Hdc 32. Hdc 2. Inc. Join. Ch 2. [88]
Rnd 5: Hdc 3. Inc. Hdc 32. (Hdc 3. Inc) 3 times. Hdc 32. Hdc 3. Inc. Join. Ch 2. [94]
Rnd 6: Hdc 4. Inc. Hdc 32. (Hdc 4. Inc) 3 times. Hdc 32. Hdc 4. Inc. Join. Ch 2. [100]
Oval base complete. [100 hdc] Do not fasten off. Continue working the body tube upward from this oval base.
Body Tube — Dark Brown Section (Lower Third)
Continue in dark brown yarn. Work in joined hdc rounds, ch 2 at the start of each round. Ch 2 does not count as a stitch throughout.
Rnds 7 to 22: Hdc in each st around. Join. [100] (16 rounds, approximately 18cm)
Body Tube — Golden Amber Transition and Bobble Section (Middle)
Join golden amber yarn.
Rnds 23 to 24: Hdc in each st around. Join. [100] (2 plain rounds to establish the color change)
Bobble Round 1 (Rnd 25): Ch 2. (Hdc 2. Bobble in next st.) rep around. Join. [approximately 33 bobbles]
Plain Round (Rnd 26): Ch 2. Hdc in each st around. Join. [100]
Bobble Round 2 (Rnd 27): Ch 2. Hdc 1. (Bobble in next st. Hdc 2.) rep around ending hdc 1. Join. [Bobbles offset from Rnd 25]
Plain Round (Rnd 28): Ch 2. Hdc around. Join. [100]
Bobble Round 3 (Rnd 29): Ch 2. Repeat Rnd 25. Join.
Plain Round (Rnd 30): Ch 2. Hdc around. Join. [100]
Bobble Round 4 (Rnd 31): Ch 2. Repeat Rnd 27. Join.
Plain Round (Rnd 32): Ch 2. Hdc around. Join. [100]
The bobble section is complete. 4 bobble rounds with offset placement give the deeply textured middle band visible in the reference photo.
Body Tube — Cream Upper Section (Shoulder and Yoke)
Join cream yarn.
Rnds 33 to 44: Ch 2. BLO hdc in each st around. Join. [100] (12 rounds, approximately 13cm)
The BLO stitch on every round creates the horizontal ridged texture visible in the cream shoulder section of the reference photo.
Neck Shaping
Rnd 45: Ch 2. (Hdc 8, dec) rep 10 times. Join. [90]
Rnd 46: Ch 2. (Hdc 7, dec) rep 10 times. Join. [80]
Rnd 47: Ch 2. (Hdc 6, dec) rep 8 times. Hdc 16. Join. [72]
Rnd 48: Ch 1. Sc in each st around. Join. Fasten off leaving a long tail.
The neck opening now measures approximately 55cm (22 inches) in circumference, sized for the hood attachment.
Button Band
The button band is a flat strip worked in cream yarn, sewn down the center front of the cocoon from the neck edge to approximately halfway down the body.
Foundation: With cream yarn, ch 7.
Row 1: Sc in 2nd ch from hook. Sc across. Turn. [6 sc]
Rows 2 to 50: Ch 1. Sc across. Turn. [6 sc]
Continue until the strip measures approximately 30cm (12 inches). Fasten off.
Buttonhole strip (work a second strip identical to the first but with buttonholes):
Repeat Rows 1 to 12. On Row 13: Ch 1. Sc. Ch 2. Sk 2. Sc. Ch 2. Sk 0. Continue to place buttonholes every 5 rows at the same 2-stitch position: buttonholes at rows 13, 18, 23, 28, and 33. Complete to 50 rows. Fasten off.
Attach the button band: Pin both strips side by side down the center front of the cocoon. The cocoon body has no front opening cut into it. The button band sits flat against the surface for decorative effect. Sew both strips firmly to the cocoon body along both long edges of each strip using matching yarn. Sew 5 wooden buttons to the plain (non-buttonhole) strip at the positions matching the buttonholes.
Lion Hood
The hood is worked as a tube from the neck edge upward, then shaped and closed at the top.
Work in golden amber yarn.
Foundation: Ch 70. Join with sl st to first ch being careful not to twist. [70 ch]
Rnd 1: Ch 2. Hdc in each ch around. Join. [70]
Rnds 2 to 12: Ch 2. Hdc in each st around. Join. [70] (11 more rounds, 12 rounds total, approximately 13cm deep)
Shaping Rnd 13: Ch 2. (Hdc 5, dec) rep 10 times. Join. [60]
Rnd 14: Ch 2. Hdc around. Join. [60]
Rnd 15: Ch 2. (Hdc 4, dec) rep 10 times. Join. [50]
Rnd 16: Ch 2. (Hdc 3, dec) rep 10 times. Join. [40]
Rnd 17: Ch 2. (Hdc 2, dec) rep 10 times. Join. [30]
Rnd 18: Ch 2. (Hdc 1, dec) rep 10 times. Join. [20]
Rnd 19: Ch 2. Dec 10 times. Join. [10]
Rnd 20: Dec 5 times. Join. [5]
Fasten off leaving a long tail. Thread tail through remaining 5 stitches, pull firmly closed, and knot securely on the inside.
Face opening: On the front side of the finished hood tube, mark the face opening position. The opening is approximately 11cm (4.25 inches) wide and 12cm (4.75 inches) tall, centered on the front face of the hood. Using sharp scissors, carefully cut a rounded oval opening in the hood fabric at this position.
Work sc edging around the entire cut face opening edge to prevent unraveling. Work one full round of sc, pulling each stitch firmly so the cut edge is completely enclosed.
Lion Mane
The mane is worked directly into the sc edging around the face opening using dark brown yarn and loop stitch. The loops face outward and form the full mane visible in the reference photo.
Join dark brown yarn at any stitch along the face opening sc edge.
Mane round: Loop st in every single sc stitch all the way around the face opening. Join with sl st. Fasten off.
Each loop should be approximately 5cm (2 inches) long for a full, lush mane. For a fuller mane, work a second loop stitch round into the back loops of the first mane round.
After all loops are complete, trim the loop tips to even lengths if needed using sharp scissors. The mane should look full and brush outward from the face opening in all directions.
Lion Ears (Make 2)
Outer ear (golden amber):
MR. Rnd 1: 6 sc. [6] Rnd 2: Inc x6. [12] Rnd 3: (Sc 1, inc) x6. [18] Rnd 4: (Sc 2, inc) x6. [24] Rnd 5: Sc around. [24] Sl st to join. Fasten off leaving long tail.
Inner ear (cream):
MR. Rnd 1: 6 sc. [6] Rnd 2: Inc x6. [12] Rnd 3: (Sc 1, inc) x6. [18] Sl st to join. Fasten off leaving long tail.
Joining: Hold inner ear centered on top of outer ear, both WS facing. Sew inner ear to the outer ear through the outer edge of the inner piece.
Work sc around the outer edge of the joined ear with golden amber yarn to finish. Fasten off.
Attach ears: Position both ears on the top of the closed hood, approximately 8 to 9cm (3 to 3.5 inches) apart. The base of each ear sits approximately 3cm from the top center point of the hood. Sew all the way around the base of each ear with multiple firm passes.
Lion Face Details on Hood
Muzzle: With cream yarn and 4.0mm hook.
MR. Rnd 1: 6 sc. [6] Rnd 2: Inc x6. [12] Rnd 3: (Sc 1, inc) x6. [18] Rnd 4: (Sc 2, inc) x6. [24] Rnd 5: (Sc 3, inc) x6. [30] Rnd 6: Sc around. [30]
Sl st to join. Fasten off leaving long tail. Stuff lightly before sewing closed. Sew the muzzle to the face area of the hood between the eyes. The muzzle sits in the lower two thirds of the face area.
Nose: With dark brown yarn and 4.0mm hook.
MR. Rnd 1: 6 sc. [6] Rnd 2: Inc x6. [12] Rnd 3: Sc around. [12] Sl st to join. Fasten off. Do not stuff. Flatten into a circular pad. Sew to the top center of the muzzle.
Eyes: Position safety eyes on the face of the hood above the muzzle, approximately 4cm apart. Insert and secure washers. For a baby-safe version, embroider filled black circles using satin stitch instead.
Whiskers: Using 3 strands of black embroidery floss, draw long straight whisker lines outward from each side of the muzzle. Work 3 whiskers per side using a single running stitch approximately 4 to 5cm long. Keep whiskers flat and parallel, angling slightly downward from the center.
Pink cheek dots: Using pink embroidery floss, work small clusters of satin stitch blush marks on each cheek area of the muzzle.
Paw Print Appliques (Make 2)
Paw base (cream):
MR. Rnd 1: 6 sc. [6] Rnd 2: Inc x6. [12] Rnd 3: (Sc 1, inc) x6. [18] Rnd 4: (Sc 2, inc) x6. [24] Rnd 5: (Sc 3, inc) x6. [30] Rnd 6: Sc around. [30] Sl st to join. Fasten off.
Toe pads (dark brown, Make 4 per paw, 8 total):
MR. 6 sc. Sl st to join. Fasten off leaving tail.
Assembling the paw print: Position four toe pad circles across the top curved edge of the cream base oval. Sew each toe pad firmly to the surface of the cream base. The arrangement shows one large central pad with three smaller ones above it but since we are making all 4 the same size, arrange three toe pads along the curved top edge and one slightly larger pad below center on the main oval area.
Sew both completed paw prints to the lower front sides of the cocoon body, one on each side of the button band at approximately round 30 from the base. Pin before sewing and check that both are positioned symmetrically.
Lion Tail
Cut 40 lengths of dark brown yarn each measuring 25cm (10 inches) long. Hold all lengths together and fold in half. At the fold point, tie a separate short length of yarn very firmly around all strands to create a gathered tassel top. Pull the gathered knot through the very bottom center of the oval base from inside to outside and tie again firmly so the tassel cannot be pulled through. Trim the tassel ends evenly to approximately 10 to 11cm (4 inches) below the knot. The tassel should hang freely from the base center.
Assembly
Step 1 — Attach hood to cocoon. Place the hood over the neck opening of the cocoon body with the face opening facing forward. The neck edge of the hood (Rnd 1 of the hood) aligns with the neck edge of the cocoon body (Rnd 48). Using cream yarn and a tapestry needle, sew the hood neck edge to the cocoon neck edge all the way around with a firm whip stitch. Work the join twice.
Step 2 — Secure all face details. Confirm every face piece is firmly attached. Tug gently on the muzzle, nose, and ears before the cocoon is used. Re-stitch anything that shifts.
Step 3 — Final safety check. Go over every element: confirm the safety eyes (or embroidered eyes) are absolutely secure, all yarn ends are woven in through at least 4 stitches in two directions, all buttons are sewn with thread through all 4 holes and knotted twice, paw prints are flat and immovable, and the tail tassel knot cannot be pulled through the base.
Finishing Touches
Wet block the finished cocoon by filling a basin with cool water and submerging the piece for 10 minutes. Squeeze out gently without wringing. Lay flat on a clean towel, reshape the oval body, and allow to dry completely. Cotton and cotton-blend yarns block beautifully and the finished cocoon will lie perfectly flat and smooth after its first blocking.
Tips and Tricks
- Make the body tube at a firm, consistent tension. A baby cocoon that is worked too loosely will stretch significantly under the weight of a newborn and can lose its shape quickly. Hold your yarn at a slightly tighter tension than your usual hdc work and check your gauge swatch after washing before committing to the full project.
- Work the loop stitch mane from the inside of the hood, not the outside. Loop stitch produces loops on the OPPOSITE side from where you insert the hook. If you want the loops on the OUTSIDE of the face opening, insert your hook from the outside of the hood toward the inside on every mane stitch. This is the one technique in the whole pattern that most confuses crocheters on the first attempt.
- Position both paw prints with pins and photograph from above before sewing. Checking symmetry in a photograph is much more reliable than eyeballing the placement directly while holding the piece. An asymmetric paw print placement is visible immediately in photos and is very hard to fix after sewing. The photograph check takes 30 seconds and saves significant frustration.
- Sew the muzzle very firmly with multiple passes of yarn through both the muzzle base and the hood fabric beneath. The muzzle is the heaviest face piece and takes the most stress during handling and photoshoots. At least 4 anchor stitches distributed evenly around the muzzle perimeter plus several criss-cross reinforcement stitches through the center are the minimum for a muzzle that will not sag or loosen.
- For newborn photography safety, do not leave a baby unattended in this cocoon. The cocoon is designed as a photography prop and brief supervised use. Remove the baby from the cocoon if unsupervised or for sleep, and never place an unsupervised baby face-down in any crocheted cocoon regardless of the yarn used.
