


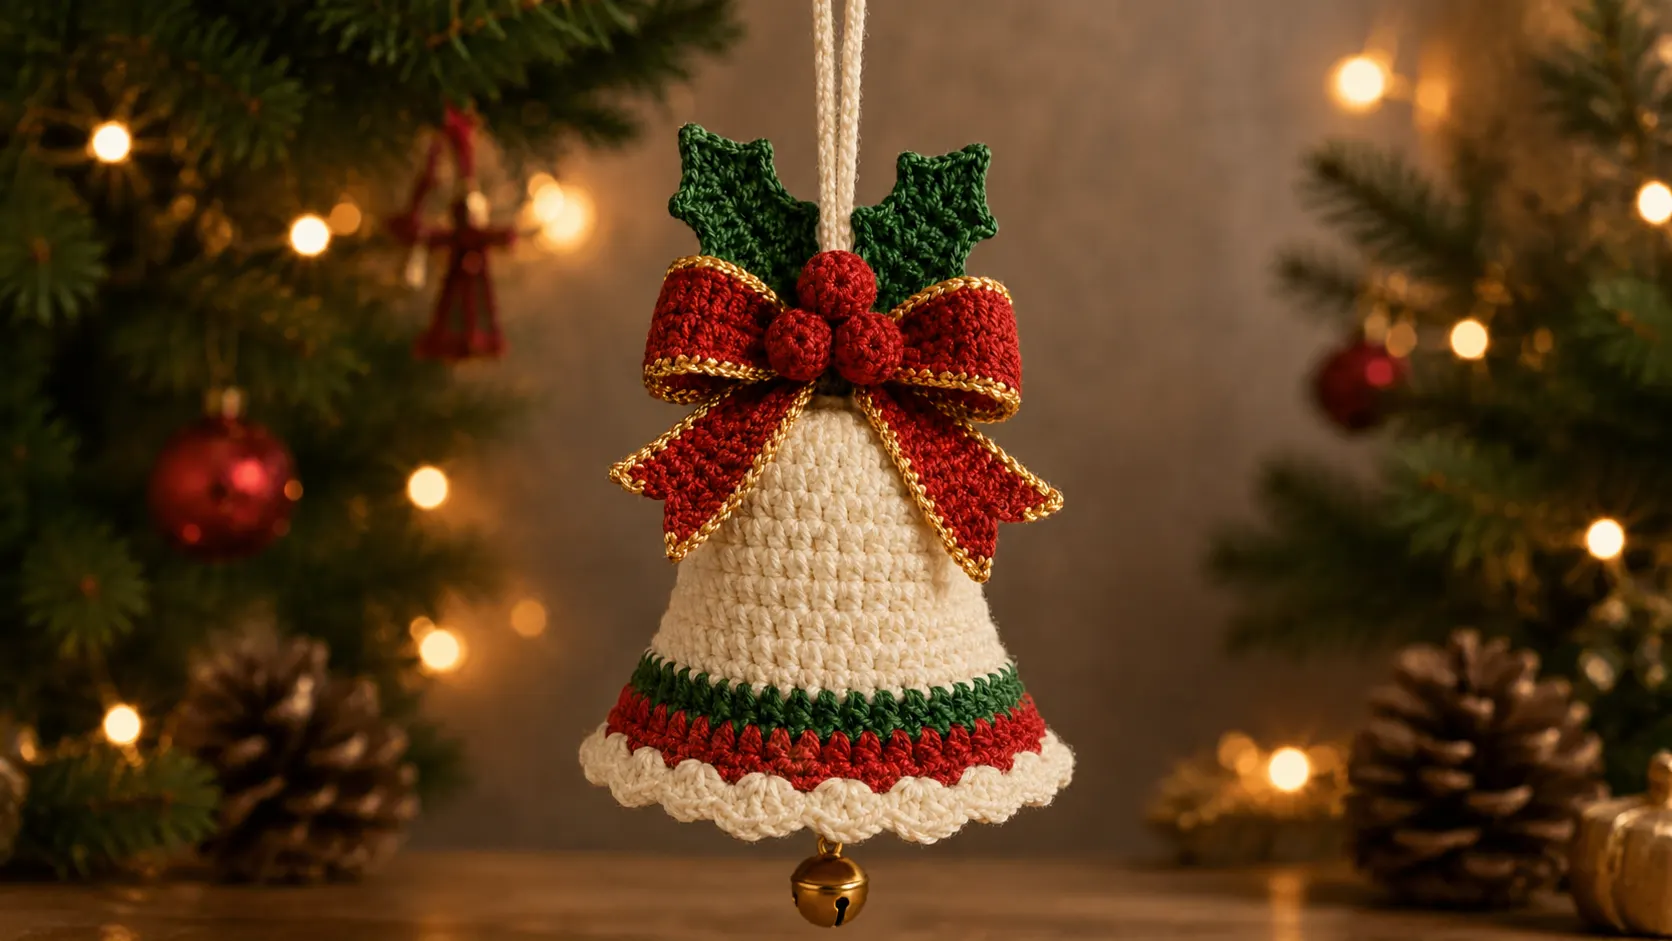
A crocheted Christmas bell ornament is one of those seasonal makes that looks genuinely heirloom quality the moment it comes off the hook. This free crochet Christmas bell pattern gives you a complete bell ornament worked in cream with forest green and red color band stripes, a cream scalloped hem border, a dramatic red bow with gold metallic trim, three pointed holly leaves, three round red berries, and a real gold jingle bell hanging from the center bottom. Every detail you see in the reference photo is covered in full below.
The bell body is worked from the top downward in joined hdc rounds that increase steadily to create the classic flared bell silhouette. The bow, holly leaves, and berries are all made separately and assembled onto the finished bell. This pattern is more involved than a basic ornament but every technique is beginner accessible and the finished piece is genuinely something to display for years.
Materials Needed
Yarn: DK weight (3) or worsted weight (4) yarn in the following colors:
Cream: approximately 50g / 1.8oz for the bell body, hanging cord, and hem border.
Christmas red: approximately 20g / 0.7oz for the bow.
Forest green: approximately 15g / 0.5oz for the color band and holly leaves.
Gold metallic yarn or thread: approximately 10g / 0.4oz for the bow edging. A thin gold crochet thread held alongside the red yarn for the bow border gives the most accurate result to the reference photo.
Hook: 4.0mm (US G/6) for the bell body and bow. 3.5mm (US E/4) for the holly leaves and berries.
Small real gold jingle bell: One, approximately 1.5 to 2cm diameter. Available at any craft store.
Tapestry needle: For sewing pieces and weaving in ends.
Stitch markers: At least 2.
Scissors
Optional polyfill stuffing: A small amount if you want to pad the bow loops for a more three-dimensional result.
Straight pins: For positioning the bow, holly, and berries before sewing.
Finished Size
Bell body height: approximately 13cm (5 inches) from top ring to bottom hem border. Bell width at widest point: approximately 15 to 16cm (6 to 6.25 inches). Total height including bow, holly, and hanging cord: approximately 22 to 24cm (8.5 to 9.5 inches).
Skill Level
Intermediate
The bell body uses joined hdc rounds with regular increases, which is straightforward once the rhythm is established. The bow construction and gold trim edging are the most involved steps. Every technique is explained in full detail below. Estimated time to complete: 4 to 6 hours across two sessions.
Abbreviations (US Terms)
MR — Magic ring
ch — Chain
sl st — Slip stitch
sc — Single crochet
hdc — Half double crochet
dc — Double crochet
inc — Increase: 2 hdc in the same stitch
sk — Skip
rnd — Round
rep — Repeat
st(s) — Stitch(es)
[X] — Stitch count at end of round
shell — 3 dc worked into the same stitch
picot — Ch 3, sl st into the 3rd ch from hook
Pattern Notes
Top-down construction: The bell body is worked from the top ring downward, with regular increases every other round to create the gradual flare of the bell silhouette. The top ring is small and the bell opens steadily wider as you work downward.
Joined rounds: Unlike continuous spiral amigurumi, this bell uses joined rounds. At the end of every round, join with a sl st to the first stitch of that round, then ch 2 and begin the next round. The ch-2 does not count as a stitch in this pattern.
Color band placement: The forest green and Christmas red bands are worked at the bottom of the cream body section just before the scalloped hem border. These color changes are simple single-color joined rounds requiring no colorwork technique.
Bow edging: The gold metallic trim on the bow is worked as a sc border around the finished bow pieces using gold metallic yarn or a strand of gold crochet thread. If you cannot find gold metallic yarn, a gold embroidery floss held with the main yarn gives a similar effect.
Assembly order: Assemble in this sequence: finish and block bell body, attach hanging cord at top, attach jingle bell at bottom, then assemble bow separately before positioning bow, holly, and berries together as a single unit on the front top of the bell.
Bell Body

Work in cream yarn throughout using the 4.0mm hook.
Foundation ring: MR. Ch 2. 8 hdc into the ring. Join with sl st to first hdc. Pull the MR tail firmly closed. [8 hdc]
The foundation ring is the very top of the bell where the hanging cord will attach.
Rnd 1: Ch 2. Inc (2 hdc) in each st around. Join. [16]
Rnd 2: Ch 2. (Hdc 1, inc) rep 8 times. Join. [24]
Rnd 3: Ch 2. Hdc in each st around. Join. [24] (even round)
Rnd 4: Ch 2. (Hdc 2, inc) rep 8 times. Join. [32]
Rnd 5: Ch 2. Hdc in each st around. Join. [32]
Rnd 6: Ch 2. (Hdc 3, inc) rep 8 times. Join. [40]
Rnd 7: Ch 2. Hdc in each st around. Join. [40]
Rnd 8: Ch 2. (Hdc 4, inc) rep 8 times. Join. [48]
Rnd 9: Ch 2. Hdc in each st around. Join. [48]
Rnd 10: Ch 2. (Hdc 5, inc) rep 8 times. Join. [56]
Rnd 11: Ch 2. Hdc in each st around. Join. [56]
Rnd 12: Ch 2. (Hdc 6, inc) rep 8 times. Join. [64]
Rnd 13: Ch 2. Hdc in each st around. Join. [64]
Rnd 14: Ch 2. (Hdc 7, inc) rep 8 times. Join. [72]
Rnd 15: Ch 2. Hdc in each st around. Join. [72]
Maximum bell width reached. Do not fasten off. Continue with the color band section.
Color band: Forest green
Join forest green at any stitch.
Rnd 16: Ch 1. Sc in each st around. Join. [72]
Rnd 17: Ch 1. Sc in each st around. Join. [72]
Color band: Christmas red
Join Christmas red.
Rnd 18: Ch 1. Sc in each st around. Join. [72]
Rnd 19: Ch 1. Sc in each st around. Join. [72]
Rnd 20: Ch 1. Sc in each st around. Join. [72]
Scalloped hem border: Cream
Join cream yarn.
Rnd 21: Ch 1. (Sc in next st. Sk 1 st. Shell: 3 dc in next st. Sk 1 st.) rep 18 times around. Join with sl st. Fasten off. [18 shells]
The scalloped border creates the soft wavy cream hem edge visible at the bottom of the bell body in the reference photo.
Hanging Cord

With cream yarn, ch 60. Sl st back along every ch to the beginning to create a firm, doubled cord. Fold in half and twist both strands together until they coil back on themselves naturally into a twisted cord. Hold the fold and allow the two sections to twist together into a 2-strand twisted cord approximately 14 to 15cm (5.5 to 6 inches) long. Knot the two cut ends together at the bottom. Thread the knotted end up through the center of the foundation ring from inside to outside and pull until the knot catches against the inside of the ring. The twisted loop extends upward from the top of the bell for hanging.
Jingle Bell Attachment
Thread a short length of cream yarn through the loop of the gold jingle bell. Pass both yarn ends through the center bottom of the bell body from outside to inside and knot firmly on the inside. The bell should hang freely and visibly beneath the scalloped hem border.
Red Bow with Gold Trim

The bow is assembled from five separate pieces: two loops, two tails, and one center knot.
Bow loops (Make 2):
Work in Christmas red yarn.
Foundation chain: Ch 22.
Rnd 1: Sc in 2nd ch from hook. Sc in next 19 ch. 3 sc in last ch. Working back along the other side of the foundation chain: sc in next 19 ch. 2 sc in first ch. Join. [44 sc]
Rnd 2: Ch 1. Inc. Sc 19. Inc 3 times. Sc 19. Inc twice. Join. [50 sc]
Rnd 3: Ch 1. Sc in each st around. Join. [50]
Fasten off leaving a long tail on one piece. Leave yarn attached on the other piece.
Gold trim on bow loops: With gold metallic yarn and the 3.5mm hook, join at any stitch on the outer edge of each finished bow loop oval. Work sc all the way around the outer edge. Join and fasten off. Repeat for second loop.
Joining the bow loops: Fold each oval so its two short ends meet, forming a teardrop or D-shaped loop. Stitch the two short ends firmly together at the base of each loop. This creates one bow loop with a visible join point at the bottom. Repeat for the second loop. Hold one joined loop in each hand and place them back-to-back so their bases overlap at the center point. Stitch the two base points together firmly. You now have the butterfly shape of a bow with two loops fanning outward.
Bow tails (Make 2):
Work in Christmas red yarn.
Ch 10. Row 1: Sc in 2nd ch from hook. Sc across. Turn. [9 sc]
Rows 2 to 7: Ch 1. Sc across. Turn. [9 sc] (6 rows even)
Row 8: Ch 1. Sc2tog. Sc 5. Sc2tog. Turn. [7]
Row 9: Ch 1. Sc2tog. Sc 3. Sc2tog. [5]
Fasten off leaving a long tail.
Gold trim on tails: With gold metallic yarn and the 3.5mm hook, work sc all the way around the outer edge of each tail piece. Fasten off.
Bow center knot:
Work in Christmas red yarn.
Ch 10. Row 1: Sc in 2nd ch from hook. Sc across. Turn. [9 sc]
Rows 2 to 5: Ch 1. Sc across. Turn. [9 sc] (4 rows even)
Fasten off.
Gold trim on knot: Work sc around the outer edge with gold yarn. Fasten off.
Assembling the bow: Lay the two loops on a flat surface side by side. Position the two tails behind and below the loops, angling slightly outward and downward from the center. Wrap the center knot piece around the junction point of both loops and both tail tops. Pull firmly and stitch the knot ends together at the back. The finished bow should have two loops fanning outward on either side, two tails dropping down and outward behind, and a neat rectangular center knot.
Holly Leaves (Make 3)

Work in forest green yarn using the 3.5mm hook.
Ch 2.
Row 1: 3 sc in 2nd ch from hook. Turn. [3]
Row 2: Ch 1. Inc. Sc. Inc. Turn. [5]
Row 3: Ch 1. Sc across. Turn. [5]
Row 4: Ch 1. Inc. Sc 3. Inc. Turn. [7]
Row 5: Ch 1. Sc across. Turn. [7]
Row 6: Ch 1. Inc. Sc 5. Inc. Turn. [9]
Row 7: Ch 1. Sc across. Turn. [9]
Fasten off leaving a long tail.
Border and holly spike points: Join forest green at the base corner of the leaf. Work sc along the first long side edge. At the top of the leaf, work the following spike points to suggest the characteristic lobed holly leaf shape: (Sc in next st. Picot: ch 3, sl st into 3rd ch from hook.) rep 4 times evenly across the top edge. Continue sc along the second long side edge back to the base. Join and fasten off.
The 4 picot spike points along the top edge create the distinctive toothed holly leaf outline. Make 3 leaves total.
Holly Berries (Make 3)

Work in Christmas red yarn using the 3.5mm hook.
MR. 8 sc into the ring. Pull the MR tail firmly to gather all stitches into a tight round bump. Fasten off leaving a long tail. The finished berry is a small, plump round circle approximately 1 to 1.5cm across. Make 3.
Final Assembly

Step 1 — Lay out the top decoration. Arrange the three holly leaves in a fan shape with one leaf pointing straight upward and one on each side at approximately 45 degrees outward. The bases of all three leaves should overlap at a central point. Hold in place with straight pins. Sew the three leaf bases firmly together with a few passes of green yarn.
Step 2 — Position the berries. Cluster the three finished berries together at the center where the three holly leaf bases meet. Sew each berry firmly to the leaf cluster base, piling them slightly on top of each other for a rounded, natural cluster look.
Step 3 — Attach the leaf and berry cluster to the bow. Position the leaf and berry cluster at the top center of the bow, sitting just above the center knot. The leaf cluster should rise above the bow while the berry cluster sits nestled at the knot level. Sew through the base of the leaf cluster and into the center knot of the bow with several firm passes.
Step 4 — Attach the complete bow assembly to the bell. Position the entire bow-leaf-berry unit at the top front of the bell body, centered horizontally and sitting just below where the hanging cord emerges from the top ring. Pin in position. Sew all the way around the back of the bow center knot, stitching through the bow and into the bell body fabric beneath. Work the join several times for strength since this unit carries its own weight and must resist any pulling.
Step 5 — Final check. Confirm the hanging cord is secure at the top ring and the jingle bell hangs freely at the bottom center. Hold the finished ornament up by the cord and allow it to hang. The bell should hang straight, the bow should sit flat against the front, and the holly leaves should fan naturally upward.
Blocking
Wet block the finished bell by lightly misting with water and reshaping while damp. Press the scalloped hem border flat with your fingers so each shell faces outward evenly. Pin the holly leaves flat in their fanned positions and allow to dry completely before removing pins. A light application of liquid starch on the holly leaves while blocking gives them a crisper, more structured finish that holds the picot spike points upright.
Tips and Tricks
- Work the bell body at a slightly tighter tension than your usual hdc. A bell ornament that is too loosely worked loses its structured conical shape and looks droopy. If the bell feels soft or floppy after the first 8 rounds, go down half a hook size for the remainder of the bell body.
- Count your stitches after every increase round in the bell body. Each increase round should add exactly 8 stitches from the previous count. An error in the increase round compounds on every following round and will show as an uneven bell shape. Catching it at Round 4 is a two-minute fix. Catching it at Round 12 means ripping back significantly.
- Make the bow loops before assembling them to check size balance. Lay both finished bow ovals flat on a surface and compare them side by side before joining. Even a small difference in foundation chain count or tension will make one loop visibly larger than the other in the finished bow. Adjust now if needed rather than after assembly.
- Use a blunt tapestry needle for the gold metallic trim passes. Gold metallic thread splits easily when worked with a sharp needle. A blunt tapestry needle slides through the stitches without splitting the metallic fibers and produces a much neater, more consistent trim line.
- Attach the jingle bell through the foundation ring of the bell body, not through the hem border stitches. Threading the jingle bell attachment yarn through the very center bottom of the bell body (the foundation of the working, not the scalloped border) gives the bell the cleanest central hang position and prevents the hem border from distorting under the weight.
