


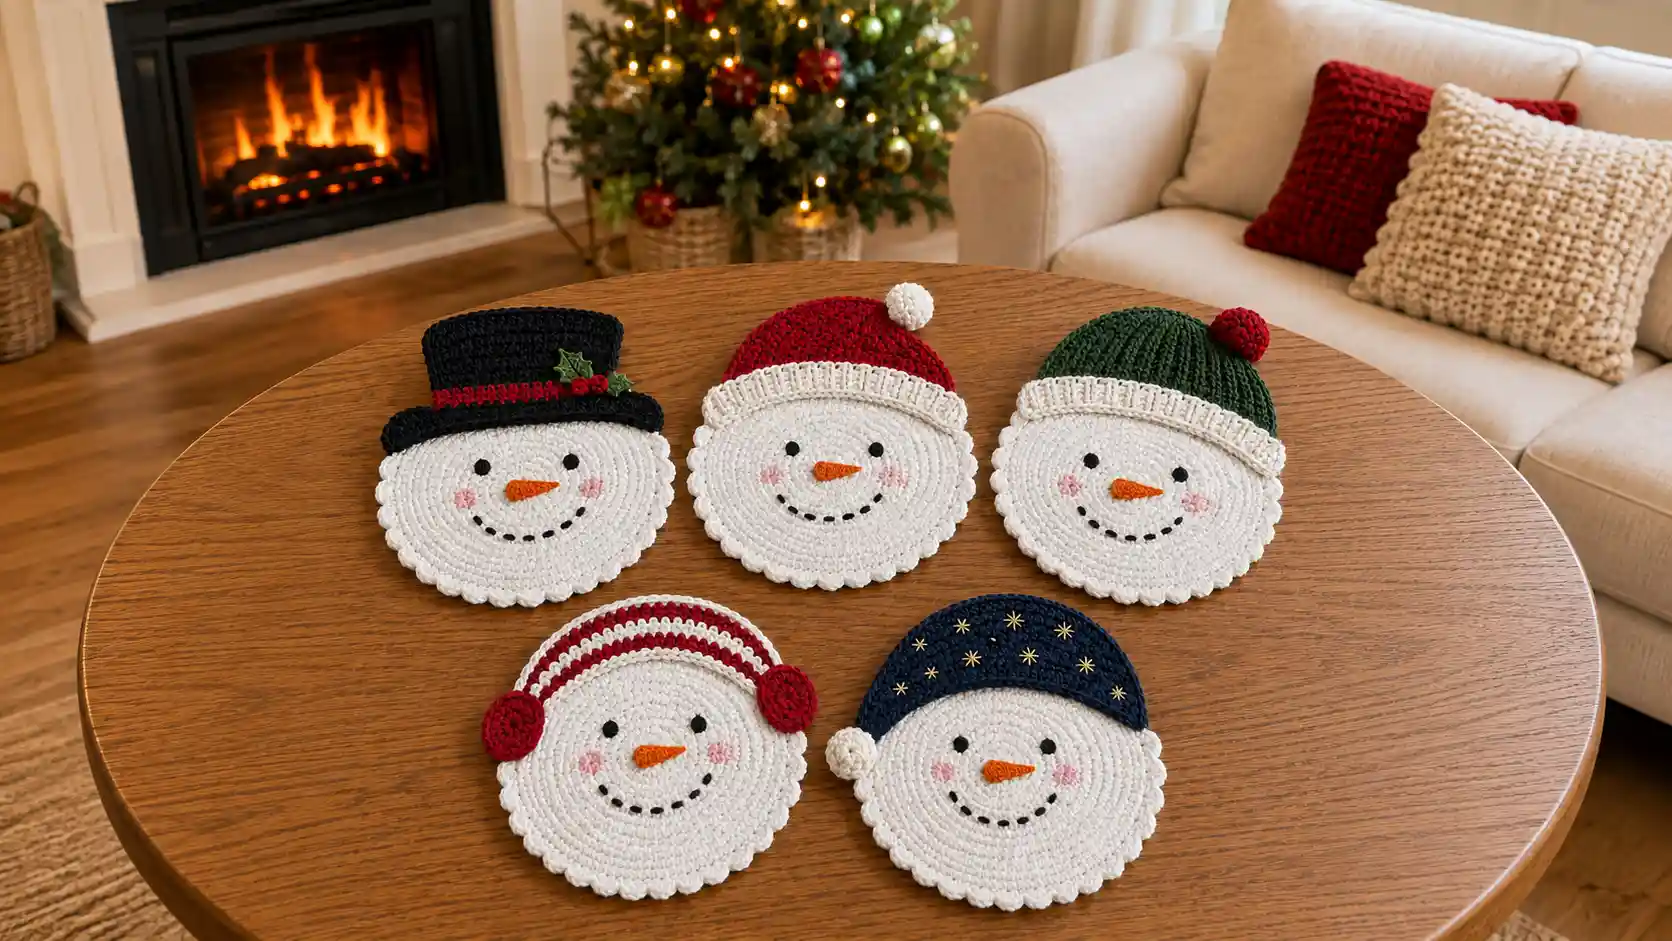
A set of crochet snowman coasters is the kind of holiday table decor that guests notice immediately and ask about every single year. This free crochet snowman coaster pattern gives you five completely different snowman faces in one collection, each sharing the same white flat circle base with an embroidered carrot nose, coal-dot smile, and rosy cheeks, and each topped with a different hat. The five designs are a classic black top hat, a red Santa hat, a forest green winter beanie, a red earmuff headband, and a navy night cap with gold star embroidery.
Every coaster finishes at approximately 20cm (8 inches) in diameter, which makes them a practical size for mugs, glasses, or small plates and a beautiful size for a Christmas table display. All five share the same face construction worked in the same order, so once you have made the first coaster you can batch-produce the remaining four in a fraction of the time.
Materials Needed
Yarn: Worsted weight (4) 100% cotton or cotton-acrylic blend for best stitch definition and flat lie. Cotton is recommended because it keeps the coaster flat without blocking and is food-safe and machine washable.
White or cream: approximately 40g per coaster, 200g total for a full set of five.
Black: approximately 5g total for embroidered face details.
Orange: approximately 5g total for carrot noses.
Pink: approximately 5g total for cheek details.
Hat-specific colors (listed per design in the hat sections below).
Hook: 5.0mm (US H/8) for the face circle and all hat pieces.
Tapestry needle: For face embroidery and sewing pieces together.
Stitch markers: At least 2.
Scissors
Black embroidery floss: For the dot smile and eyes.
Orange embroidery floss or yarn: For the carrot nose fill.
Pink embroidery floss: For the rosy cheek circles.
Straight pins: For positioning hat pieces before sewing.
Optional: Fabric stiffener spray to help the finished coasters lie completely flat.
Finished Size
Each finished coaster measures approximately 20cm (8 inches) in diameter including the scalloped border.
All five coasters are the same size. Only the hat pieces change between designs.
Skill Level
Beginner
The face circle uses only magic ring, single crochet, and increase. The hats are flat pieces worked in rows. The face details are simple embroidery worked on a flat surface. Estimated time per coaster: 2 to 3 hours including all face embroidery.
Abbreviations (US Terms)
MR — Magic ring
ch — Chain
sl st — Slip stitch
sc — Single crochet
hdc — Half double crochet
dc — Double crochet
BLO — Back loop only
inc — Increase: 2 sc in the same stitch
dec — Sc2tog: insert hook in next st, pull up loop, insert hook in following st, pull up loop, yarn over and pull through all 3 loops
rnd — Round
rep — Repeat
st(s) — Stitch(es)
[X] — Stitch count at end of round or row
shell — 3 dc worked into the same stitch
Pattern Notes
The flat circle must lie completely flat. If your circle starts to dome or cup as you work, your tension is too tight. Go up one hook size. If it ruffles at the edges, your tension is too loose or you have added extra stitches. Go down one hook size or recount your stitches.
Work in a continuous spiral for the face circle. Do not join at the end of each round. Place a stitch marker in the first stitch of each round and move it up as you work. The only exception is the scalloped border, which is worked as one joined round.
Embroider the face before sewing on the hat. Working on a bare flat circle gives you unobstructed access to the full face surface. Adding the hat first blocks the upper section of the face and makes embroidery awkward.
Flat hat pieces are worked in rows. All five hat designs are worked as flat pieces in rows, then sewn onto the top section of the finished face circle. None of the hats are stuffed or three-dimensional.
Snowman Face Circle (Make 1 per coaster, identical for all 5 designs)

Work in white or cream yarn.
Rnd 1: MR, 6 sc. [6]
Rnd 2: Inc in each st around. [12]
Rnd 3: (Sc 1, inc) rep 6 times. [18]
Rnd 4: (Sc 2, inc) rep 6 times. [24]
Rnd 5: (Sc 3, inc) rep 6 times. [30]
Rnd 6: (Sc 4, inc) rep 6 times. [36]
Rnd 7: (Sc 5, inc) rep 6 times. [42]
Rnd 8: (Sc 6, inc) rep 6 times. [48]
Rnd 9: (Sc 7, inc) rep 6 times. [54]
Rnd 10: (Sc 8, inc) rep 6 times. [60]
Rnd 11: (Sc 9, inc) rep 6 times. [66]
Rnd 12: (Sc 10, inc) rep 6 times. [72]
Sl st to join to first sc. Do not fasten off. Continue to scalloped border.
Scalloped border:
Rnd 13: Ch 1. (Sc in next st. Sk 1 st. Shell: 3 dc in next st. Sk 1 st.) rep 18 times around. Join with sl st to first sc. Fasten off. [18 shells]
The scalloped border gives the coaster its finished, decorative outer edge visible in the reference photo.
Face Embroidery (Same for All 5 Designs)

Complete this on every coaster before adding the hat.
Eyes: Using black embroidery floss or a short length of black yarn, embroider two small filled circles approximately 1 to 1.5cm in diameter. Position the eyes in the upper center of the circle, approximately one third of the way down from the top edge, spaced about 3 to 4cm apart. Use satin stitch to fill each eye circle solidly and uniformly.
Carrot nose: Using orange yarn or embroidery floss, embroider a small filled triangle between and just below the two eyes, wider at the top and narrowing to a point downward. The nose should be approximately 1.5cm long and 1cm wide at the top. Fill with satin stitch worked horizontally across the triangle width.
Rosy cheeks: Using pink embroidery floss, embroider two soft circles of satin stitch approximately 1.5 to 2cm in diameter, one below and outside each eye. The cheeks sit at approximately the same height as the nose or slightly below, well to the left and right of the nose.
Coal-dot smile: Using black embroidery floss, embroider 7 to 8 small dots in a gentle upward curve below the nose. Each dot is a small tight cluster of 3 to 4 satin stitches worked into a single small point. Space the dots approximately 3 to 4mm apart along the curve. The curved smile gives each snowman its warm, friendly expression.
Design 1 — Classic Black Top Hat

Hat colors needed: Black approximately 10g. Christmas red approximately 3g. Forest green approximately 3g for holly leaves. Small amount of red for berries.
Hat body (flat rectangle):
Work in black yarn.
Ch 21. Row 1: Sc in 2nd ch from hook. Sc across. Turn. [20 sc]
Rows 2 to 5: Ch 1. Sc across. Turn. [20] (hat body lower section)
Row 6: Switch to Christmas red. Ch 1. Sc across. Turn. [20] (hatband row 1)
Row 7: Ch 1. Sc across. Turn. [20] (hatband row 2)
Row 8: Switch to black. Ch 1. Sc across. Turn. [20]
Rows 9 to 13: Ch 1. Sc across. Turn. [20] (hat body upper section)
Fasten off leaving a long tail. The finished hat body piece is a flat rectangle approximately 13cm wide and 9cm tall with a red hatband visible across the lower section.
Hat brim (flat strip):
Work in black yarn.
Ch 31. Row 1: Sc in 2nd ch from hook. Sc across. Turn. [30 sc]
Rows 2 to 3: Ch 1. Sc across. Turn. [30]
Fasten off leaving a long tail.
Joining hat pieces: Center the hat body along the top edge of the brim strip. The brim should extend approximately 5 stitches beyond each side of the hat body. Sew the bottom edge of the hat body to the top of the brim strip using the long tail.
Work one round of sc around the entire outer edge of the joined hat piece for a clean, finished look.
Holly decoration:
Holly leaves (Make 2): Ch 8. Sc in 2nd ch from hook. Sc. Hdc. Dc. Hdc. Sc. Sl st in last ch. Fasten off. This gives a small pointed leaf shape approximately 3cm long.
Berries (Make 3): MR, 6 sc. Pull the MR tail tight to gather into a small round bump approximately 0.8cm across. Fasten off leaving a tail.
Sew the two holly leaves crossed at their bases and the three berries clustered at the leaf base junction onto the front of the red hatband, slightly left of center.
Attaching the hat: Position the completed hat on the top of the finished, embroidered snowman face circle. The bottom edge of the brim sits approximately 2 rounds down from the top edge of the circle, centered left to right. The hat body rises upward above the circle. Pin in place. Sew all the way around the bottom edge of the brim, stitching the brim firmly to the circle fabric.
Design 2 — Red Santa Hat

Hat colors needed: Christmas red approximately 12g. White or cream approximately 8g.
Hat body (cone shape, worked in rows):
Work in Christmas red yarn.
Ch 31. Row 1: Sc in 2nd ch from hook. Sc across. Turn. [30 sc]
Row 2: Ch 1. Sc2tog. Sc 26. Sc2tog. Turn. [28]
Row 3: Ch 1. Sc across. Turn. [28]
Row 4: Ch 1. Sc2tog. Sc 24. Sc2tog. Turn. [26]
Row 5: Ch 1. Sc across. Turn. [26]
Row 6: Ch 1. Sc2tog. Sc 22. Sc2tog. Turn. [24]
Row 7: Ch 1. Sc across. Turn. [24]
Row 8: Ch 1. Sc2tog. Sc 20. Sc2tog. Turn. [22]
Row 9: Ch 1. Sc across. Turn. [22]
Row 10: Ch 1. Sc2tog. Sc 18. Sc2tog. Turn. [20]
Row 11: Ch 1. Sc across. Turn. [20]
Row 12: Ch 1. Sc2tog. Sc 16. Sc2tog. Turn. [18]
Row 13: Ch 1. Sc across. Turn. [18]
Row 14: Ch 1. Sc2tog. Sc 14. Sc2tog. Turn. [16]
Row 15: Ch 1. Sc across. Turn. [16]
Row 16: Ch 1. Sc2tog. Sc 12. Sc2tog. Turn. [14]
Row 17: Ch 1. Sc2tog. Sc 10. Sc2tog. Turn. [12]
Row 18: Ch 1. Sc2tog. Sc 8. Sc2tog. Turn. [10]
Row 19: Ch 1. Sc2tog. Sc 6. Sc2tog. Turn. [8]
Row 20: Ch 1. Sc2tog. Sc 4. Sc2tog. Turn. [6]
Row 21: Ch 1. Sc2tog. Sc 2. Sc2tog. [4]
Row 22: Sc2tog twice. [2]
Row 23: Sc2tog. [1]
Fasten off. The finished piece is a triangle/cone shape that droops slightly naturally to one side, matching the reference photo.
White ribbed cuff:
Working along the bottom (longest, straight) edge of the hat, join white yarn.
Row 1: Ch 1. Sc in each st along the bottom edge. Turn. [30 sc]
Row 2: Ch 1. BLO sc across. Turn. [30]
Row 3: Ch 1. BLO sc across. Turn. [30]
Row 4: Ch 1. BLO sc across. [30]
Fasten off. The BLO rows create the ribbed texture visible on the white cuff in the reference photo.
White pom-pom: Wrap white yarn around two fingers approximately 25 times. Slide off fingers, tie firmly at the center, and cut the loops. Fluff into a small round pom-pom approximately 1.5 to 2cm in diameter. Trim neatly. Sew to the very tip point of the hat.
Attaching the hat: The Santa hat sits on the top right section of the face circle, angled so the cone droops toward the right. The white cuff base sits across the top approximately 2 to 3 rounds below the circle edge. Sew along the full length of the cuff base edge to secure.
Design 3 — Forest Green Winter Beanie

Hat colors needed: Forest green approximately 12g. White or cream approximately 6g. Christmas red approximately 3g for the pom-pom.
Hat body (dome shape, worked in rows):
Work in forest green yarn.
Ch 31. Row 1: Sc in 2nd ch from hook. Sc across. Turn. [30 sc]
Rows 2 to 6: Ch 1. Sc across. Turn. [30] (5 even rows)
Row 7: Ch 1. Sc2tog. Sc 26. Sc2tog. Turn. [28]
Row 8: Ch 1. Sc across. Turn. [28]
Row 9: Ch 1. Sc2tog. Sc 24. Sc2tog. Turn. [26]
Row 10: Ch 1. Sc across. Turn. [26]
Row 11: Ch 1. Sc2tog. Sc 22. Sc2tog. Turn. [24]
Row 12: Ch 1. Sc across. Turn. [24]
Row 13: Ch 1. Sc2tog. Sc 20. Sc2tog. Turn. [22]
Row 14: Ch 1. Sc across. Turn. [22]
Row 15: Ch 1. Sc2tog. Sc 18. Sc2tog. Turn. [20]
Row 16: Ch 1. Sc2tog twice. Sc 12. Sc2tog twice. Turn. [16]
Row 17: Ch 1. Sc2tog twice. Sc 8. Sc2tog twice. Turn. [12]
Row 18: Ch 1. Sc2tog. Sc 8. Sc2tog. [10]
Sc evenly across the remaining 10 sts, pulling them together into a gathered top edge. Fasten off leaving a long tail. Thread the tail through the top edge sts and pull to close the rounded top of the beanie.
White ribbed cuff:
Working along the bottom edge of the hat, join white yarn.
Row 1: Ch 1. Sc along bottom edge. Turn. [30 sc]
Rows 2 to 4: Ch 1. BLO sc across. Turn. [30]
Fasten off.
Red pom-pom: Make a small pom-pom in Christmas red approximately 1.5cm in diameter following the same method as Design 2. Sew to the rounded top of the hat. In the reference photo the pom-pom sits to the right side of the top edge.
Attaching the hat: Center the beanie on the top of the face circle with the cuff sitting approximately 2 rounds below the top edge of the circle. Sew along the full cuff base edge.
Design 4 — Red Earmuff Headband

Hat colors needed: Christmas red approximately 10g. White approximately 3g.
Headband strip:
The earmuff headband wraps across the middle of the snowman face rather than sitting on top. The strip runs across the face horizontally approximately one third from the top of the circle.
Work in Christmas red yarn.
Ch 5. Row 1: Sc in 2nd ch from hook. Sc across. Turn. [4 sc]
Row 2: Ch 1. Sc across. Turn. [4]
Continue working 4-stitch sc rows until the strip measures 22cm (approximately 8.5 inches) in total length.
Stripe detail: For the red and white stripes visible in the reference photo, work 3 rows red, 1 row white, 1 row red, 1 row white, 3 rows red throughout the strip length.
Fasten off.
Earmuff circles (Make 2):
Work in Christmas red yarn.
Rnd 1: MR, 6 sc. [6]
Rnd 2: Inc in each st around. [12]
Rnd 3: (Sc 1, inc) rep 6 times. [18]
Rnd 4: Sc in each st around. [18]
Sl st to join. Fasten off leaving a long tail.
Each earmuff is a small flat circle approximately 4 to 4.5cm in diameter.
Assembling and attaching: Sew one earmuff circle to each short end of the headband strip. Position the full headband assembly across the top third of the snowman face circle, curving it so the earmuffs sit on either side of the circle. The strip runs across the face and the earmuffs wrap around each outer side edge of the circle. Pin carefully before sewing. Sew along the full length of the strip where it crosses the face circle, and sew each earmuff where it overlaps the circle edge.
Design 5 — Navy Night Cap with Gold Stars

Hat colors needed: Dark navy blue approximately 12g. Gold metallic yarn or embroidery floss approximately 5g for the star embroidery. White approximately 3g for the pom-pom.
Hat body (drooping cone shape):
Work in dark navy blue yarn.
Work exactly the same construction as Design 2 (Red Santa Hat), following Rows 1 to 23 with the same decrease sequence, substituting navy blue for red throughout.
After completion, the hat piece is the same cone/triangle shape as the Santa hat and droops naturally to one side.
Gold star embroidery:
Before attaching the hat to the coaster, embroider 8 to 10 small five-point stars scattered across the hat body surface using gold metallic yarn or 3 strands of gold embroidery floss.
To embroider each star: Work a small cross stitch (plus sign shape). Then work a second cross stitch at 45 degrees overlapping the first to create an 8-point star shape. Alternatively, work a small asterisk of 5 straight stitches all radiating from a single center point. Keep each star approximately 0.8 to 1cm across for the most accurate look matching the reference photo.
Scatter the stars across the upper two thirds of the hat body, spacing them 1.5 to 2cm apart. Do not crowd the stars.
White pom-pom: Make a small white pom-pom approximately 1.5 to 2cm in diameter. Sew to the very tip of the hat.
Attaching the hat: Position the night cap on the top section of the face circle, angling it slightly to the right so the tip with the pom-pom droops to the right, matching the reference photo. The base of the hat sits approximately 2 rounds below the top edge of the circle. Sew along the straight base edge of the hat to secure.
Finishing Touches for All Five Coasters

After assembling each coaster, weave in all ends securely on the back of the piece.
For the flattest result, wet block every finished coaster. Soak in cool water for 5 minutes, squeeze out gently, and lay flat on a clean towel. Smooth into a perfect circle shape by hand and allow to dry completely. Cotton coasters block beautifully and stay flat after drying.
For an extra-firm finish, apply a light coat of fabric stiffener to the face circle and allow to dry flat. Do not apply stiffener to the embroidered face areas as it can dull the embroidery floss.
Store the finished set stacked flat rather than rolled to keep all five circles in their correct flat shape between uses.
Tips and Tricks
- Make all five face circles before starting any of the hats. Working all five circles in one sitting builds a consistent rhythm and keeps your tension identical across the whole set. A set where all five circles are the same size and lie exactly flat together looks far more intentional and professional than one where each circle was worked at a different tension on different days.
- Embroider the smile as a curve, not a flat line. Measuring the center of the face and placing the smile dots in a gentle upward arc, with the outer dots curving higher than the center dots, is the specific detail that makes each snowman look genuinely cheerful rather than neutral or surprised. Take an extra minute to mark the curve with a fabric marker or pins before stitching.
- Stagger the earmuff headband stripe placement on Design 4. The stripe sequence of red-white-red-white-red creates the visual rhythm visible in the reference photo. Working all white stripes in the same position relative to the face gives a more balanced appearance than random stripe placement.
- Work the gold stars on Design 5 before the hat is attached to the coaster. Stars embroidered on a flat, unattached piece are much easier to work neatly and evenly than stars added after the hat is sewn to the curved circle.
- Use a locking stitch marker rather than a standard open marker for the face circle spiral. A locking marker slides into the stitch itself and stays put as you pull and flatten the work during construction. An open marker can fall out during the frequent checking and flattening that a flat circle construction requires.
