


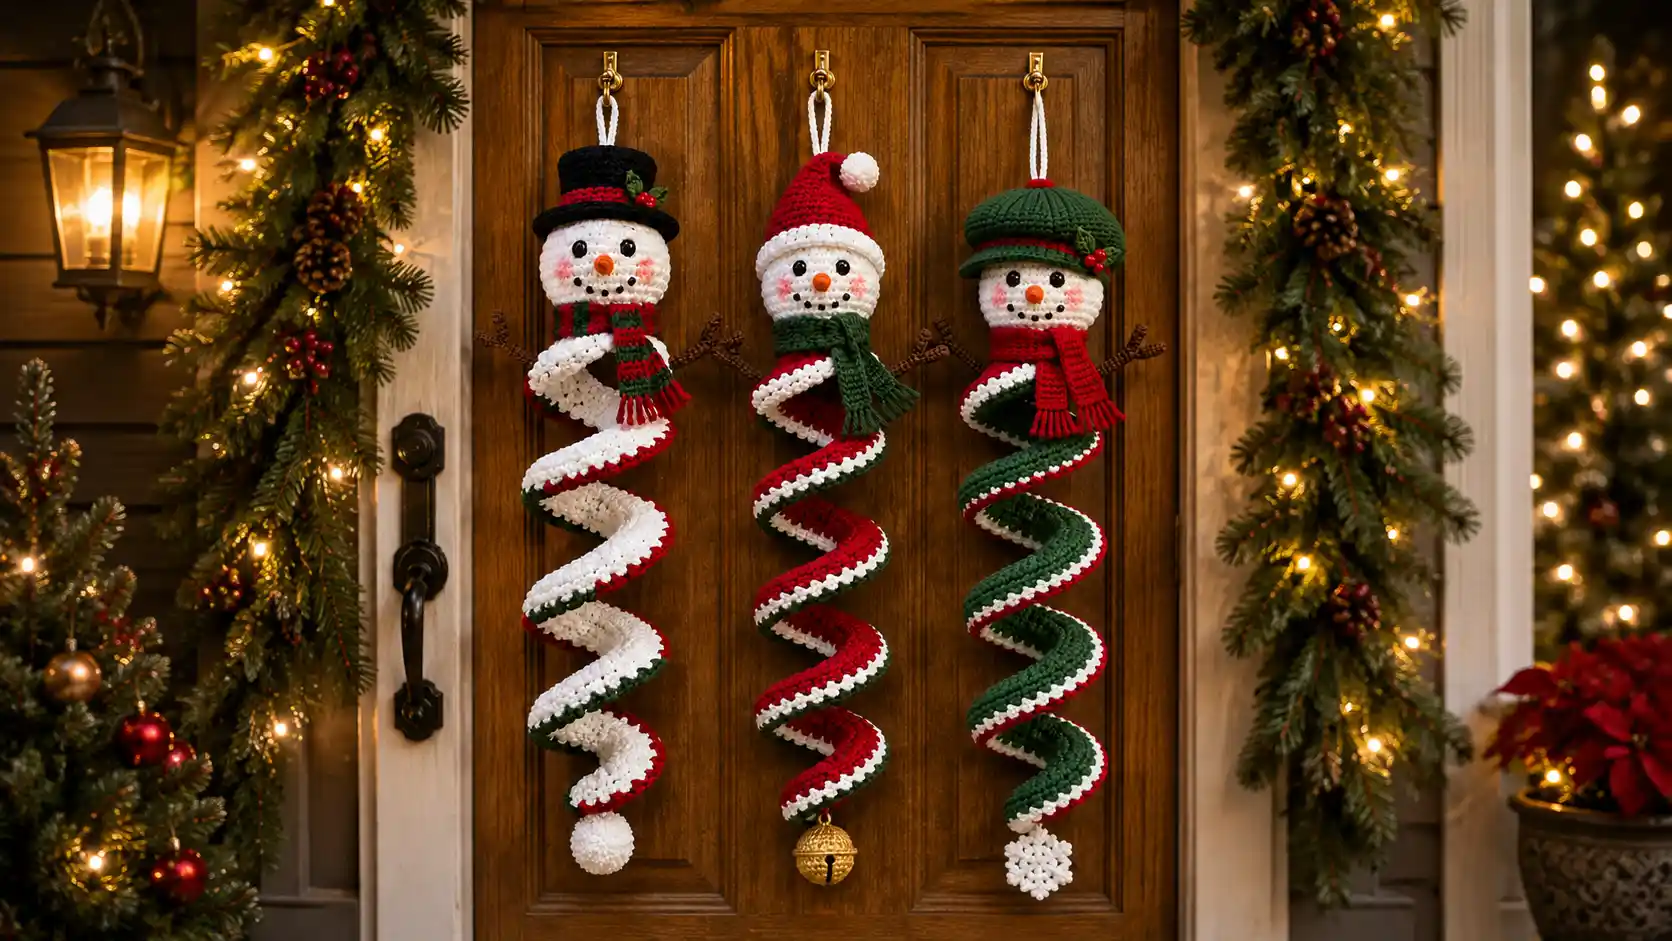
This crochet Christmas snowman wind spinner is one of those projects that stops people in their tracks the moment they see it hanging on a door. Three designs in one pattern, a classic black top hat snowman, a jolly Santa hat snowman, and a woodland newsboy cap snowman, each with a self-curling corkscrew spiral body that spins gently in the breeze. All three share the same stuffed round head, branch arms, scarf, and hanging loop construction. Only the hat, scarf colors, spiral colors, and bottom ornament change between them.
Every technique in this pattern is explained from scratch below, including the self-curling spiral mechanic that is the real showpiece of this project. Read the spiral section before you pick up your hook. Once you understand how four double crochets packed into every single chain stitch forces the strip to twist on its own, the whole pattern clicks into place and the build becomes completely logical from start to finish.
Yarn: Category 4 worsted weight cotton, acrylic, or durable acrylic blend. Quantities below cover all three designs together. For one single spinner, budget approximately 280 to 350g total.
White: 550 to 650g total. Christmas red: 300 to 350g. Forest green: 250 to 300g. Black: 100 to 130g. Orange: 15 to 20g. Brown: 70 to 90g. Pink: 15 to 20g. Small amounts of gold and burgundy.
Hook: 4.0mm main hook throughout. Optional 3.5mm hook for facial details
Additional supplies: Polyester fiberfill for stuffing. Yarn and tapestry needle. Scissors, measuring tape, stitch markers, straight pins. Pom-pom maker or cardboard template for Design 1 and Design 2. Flexible craft wire, wire cutters, and small pliers for spiral spine and branch arms. Optional plastic canvas disc for head stability. Optional rust-resistant swivel hook. Optional small gold bell for Design 2. Optional 16 to 18mm black safety eyes.
Finished Measurements
Total hanging length: approximately 38 to 42 inches (97 to 107cm). Head width: approximately 7 to 8 inches (18 to 20cm). Spiral body: approximately 27 to 31 inches long with 10 corkscrew turns. Scarf length: approximately 22 to 26 inches.
Skill Level
Advanced Beginner to Intermediate. Every technique is explained in full below. Realistic planning: build the head and face in one session, the spiral body in another (it is long and deserves its own dedicated sit-down), and the hat, scarf, and ornament in a third.
Abbreviations (US Terms)
ch — Chain. sl st — Slip stitch. sc — Single crochet. hdc — Half double crochet. dc — Double crochet. inc — Increase (2 sts in same st). dec — Invisible sc decrease. MC — Magic circle / magic ring. BLO — Back loop only. shell — 5 dc worked into one stitch. sk — Skip.
Gauge
16 sc x 18 rows = 4 x 4 inches (10 x 10cm) on a 4.0mm hook. Exact gauge is not critical for the spiral. The head should be worked firmly enough that stuffing does not show through. If you can see fiberfill through your stitches, drop one hook size for the head sections specifically.
Part 1 — Reinforced Hanging Loop

A twisted white cord loop approximately 5 to 6 inches long sits at the very top of the finished spinner.
Ch 60. Sl st into the 2nd ch from hook and each ch back across so the chain doubles back on itself into a firm, cord-like strand. Fold the finished cord in half to form a loop approximately 5.5 inches long and sl st the two cut ends together to close. If your finished loop measures outside 5 to 6 inches, adjust the starting chain by 6 to 8 sts and rework.
Part 2 — Stuffed Round Head

Work in white in continuous rounds. Do NOT join with a sl st or turn at the end of each round. Use a stitch marker in the first stitch of every round throughout.
Rnd 1: MC, 6 sc. [6] Rnd 2: Inc in every st. [12] Rnd 3: (Sc 1, inc) rep 6 times. [18] Rnd 4: (Sc 2, inc) rep 6 times. [24] Rnd 5: (Sc 3, inc) rep 6 times. [30] Rnd 6: (Sc 4, inc) rep 6 times. [36] Rnd 7: (Sc 5, inc) rep 6 times. [42] Rnd 8: (Sc 6, inc) rep 6 times. [48] Rnd 9: (Sc 7, inc) rep 6 times. [54] Rnd 10: (Sc 8, inc) rep 6 times. [60] Rnd 11: (Sc 9, inc) rep 6 times. [66] Rnd 12: (Sc 10, inc) rep 6 times. [72] Rnd 13: (Sc 11, inc) rep 6 times. [78] Rnd 14: (Sc 12, inc) rep 6 times. [84] Rnd 15: (Sc 13, inc) rep 6 times. [90] Rnd 16: (Sc 14, inc) rep 6 times. [96] Maximum width reached.
Rnds 17 to 19: Sc even, no shaping. [96]
Rnd 20: (Sc 14, dec) rep 6 times. [90] Rnd 21: (Sc 13, dec) rep 6 times. [84] Rnd 22: (Sc 12, dec) rep 6 times. [78] Rnd 23: (Sc 11, dec) rep 6 times. [72] Rnd 24: (Sc 10, dec) rep 6 times. [66] Rnd 25: (Sc 9, dec) rep 6 times. [60]
Begin stuffing firmly at Round 26. Add stuffing gradually as the opening narrows. Rnd 26: (Sc 8, dec) rep 6 times. [54] Rnd 27: (Sc 7, dec) rep 6 times. [48] Rnd 28: (Sc 6, dec) rep 6 times. [42] Rnd 29: (Sc 5, dec) rep 6 times. [36] Rnd 30: (Sc 4, dec) rep 6 times. [30] Rnd 31: (Sc 3, dec) rep 6 times. [24] Rnd 32: (Sc 2, dec) rep 6 times. [18] Rnd 33: (Sc 1, dec) rep 6 times. [12]
Add final stuffing, pressing gently from the outside to even out the shape. Rnd 34: Dec 6 times. [6] Fasten off leaving a long tail. Thread tail through remaining 6 sts, pull snug to close, weave in securely inside. Total: 34 rounds, approximately 7 to 7.5 inch diameter.
Part 3 — Face
Eyes: Embroider a small tight satin-stitch circle or several stacked French knots in black yarn at each eye position, approximately 1.5 inches apart and one third of the way down from the head top. Alternatively, insert 16 to 18mm safety eyes at these positions before Round 34 while the head is still accessible.
Carrot nose: MC, 5 sc. [5] Rnd 2: Inc in every st. [10] Rnds 3 to 4: Sc even. [10] Rnd 5: (Sc 3, dec) rep 2 times. [8] Rnd 6: (Sc 2, dec) rep 2 times. [6] Lightly stuff, fasten off leaving a long tail. Sew the nose to the face center, between and slightly below the eyes, pointing outward. Keep stuffing light, a carrot nose that is overstuffed looks like a ball rather than a taper.
Rosy cheeks: Embroider a small soft satin-stitch circle in pink yarn below and outside each eye, or make 2 tiny flat circles (MC, 5 sc, fasten off) and sew in place.
Coal-dot smile: Embroider 5 to 6 small French knots or satin-stitch dots in black yarn in a gentle upward curve below the nose.
Part 4 — Branch Arms (Make 2)
Cut one 6-inch piece of flexible craft wire for the main arm and one 2-inch piece for a side-branch twig. Twist the short piece around the main wire approximately one third of the way along its length so it angles outward like a branch offshoot. Bend both wire ends into small closed loops so wire cannot poke through the yarn later.
With brown yarn, work sc tightly along the full length of the wire assembly, encasing both the main branch and the small offshoot completely. Go over the assembly a second time if any wire is still visible. Fasten off leaving a base tail for sewing.
Repeat for the second arm, keeping the side-branch twig at approximately the same position and angle on both.
Part 5 — Self-Curling Spiral Body

Read this entire section before starting. This section is the heart of the whole pattern.
How it works: A flat strip of crochet fabric, if you force four tall stitches into every single chain stitch along its length instead of the usual one, has too much fabric for the foundation to lie flat. The excess fabric ruffles and twists out of the flat plane, curling automatically into a continuous corkscrew. You do not shape anything by hand while crocheting. The stitch density alone does this. If you find yourself trying to manually curl the strip as you work, stop. Manual twisting fights the stitches and produces an uneven result.
The main color changes by design: white for Design 1, Christmas red for Design 2, forest green for Design 3. Everything else below is identical across all three.
Foundation chain: With your design’s main color and a 4.0mm hook, ch 121. Count carefully in small batches of 10 and place stitch markers every 10 stitches as you go. Do not turn or crochet into it yet.
Marking the chain: Starting from the 2nd chain from your hook (this is where your first stitch goes), count 12 chain stitches and place a marker in the 12th. Continue placing markers at every 12th chain: markers land at chains 12, 24, 36, 48, 60, 72, 84, 96, 108, and the very last chain stitch (120). You should have 10 markers total, dividing the 120 working chains into 10 equal sections of 12 stitches each. Do this before crocheting anything.
Working the spiral: Insert your hook into the 2nd chain from your hook. Yarn over, pull up a loop (2 loops on hook). Yarn over, pull through both loops (1 dc complete). Without moving to a new chain, insert into that SAME chain stitch again. Work a 2nd dc there, then a 3rd, then a 4th. All four sit in that one single chain stitch. Only now do you move to the next chain and repeat: 4 dc into that next chain stitch, then move on. Every single chain stitch across all 120 chains gets exactly 4 dc, no more and no less, before you move to the next.
After the first 12 stitches you should already see the strip twisting rather than lying flat. If the strip is still completely flat after 12 stitches, double-check you are working 4 dc into every chain.
Continue the 4-dc-per-chain pattern all the way to the final marker at chain stitch 120. Fasten off leaving a long tail of at least 8 inches.
Adding the wire core: Cut flexible craft wire approximately 48 inches long. Bend a small closed loop at one end. Feed the looped end into the very first chain stitch of the foundation chain and thread it through the original foundation chain specifically, following the chain through every twist and turn, until it emerges at chain stitch 120. Bend a small closed loop at the second end. Gently reshape the spiral by hand along its length, smoothing any turn that looks tighter or looser than its neighbors.
Length check: Lay the wired spiral flat and measure end to end without stretching. The head, hanging loop, and bottom ornament together account for approximately 14 inches of the finished total. The spiral itself should land nearer 27 to 28 inches rather than the top of its 27 to 31 inch range, or the finished piece will exceed 42 inches overall. If your spiral is running long before reaching the last few chains, fasten off slightly early. If it is running short, add a few extra chain stitches before beginning the density row next time.
Part 6 — Contrasting Spiral Edging
The spiral has two long edges: the spine edge (following the original foundation chain) and the outer edge (the fuller, ruffled side where the dc stitches fan out). Both edges get their own edging pass.
Design 1 (Classic Top Hat): Join Christmas red along the outer edge. Work (sk 1 st, shell of 5 dc in next st, sk 1 st, sl st in next st) evenly along the entire outer edge. Fasten off. Join forest green along the spine edge. Work 1 round of sc evenly along that edge as a plain trim. Fasten off.
Design 2 (Santa Hat): Join forest green along the outer edge. Work 1 round sc evenly as a base line. Do not fasten off. Switch to white. Work (sk 1 st, shell of 5 dc in next st, sk 1 st, sl st in next st) evenly along the same edge on top of the green base. Fasten off. Repeat both passes along the spine edge.
Design 3 (Woodland Newsboy): Join Christmas red along the outer edge. Work 1 round sc as a base line. Switch to white. Work the shell scallop pass on top. Fasten off. Repeat both passes along the spine edge.
Part 7 — Scarf

Ch 9. Row 1: Sc in 2nd ch from hook and each ch across, turn. [8 sts] Continue sc across, turning each row, for approximately 108 rows total (approximately 24 inches).
Design 1 color sequence: 6 rows Christmas red, 6 rows forest green, repeating for the full length.
Design 2 color sequence: Solid forest green throughout, alternating 1 row regular sc with 1 row BLO sc every other row for a subtle ridged texture.
Design 3 color sequence: Solid bright red throughout with no texture variation.
Fringe: Cut yarn into 8-inch lengths. Fold each length in half and attach into the last stitch of each short end by pulling the folded loop through the stitch and drawing both cut ends through that loop. Trim fringe evenly.
Part 8 — Hat (Work Only Your Chosen Design)
Design 1: Classic Black Top Hat

Crown: MC in black. Rnd 1: 6 sc. Rnd 2: Inc x6. [12] Rnds 3 to 15: increase 6 sts per round following (sc n, inc) x6 pattern until 90 sts at Rnd 15. Rnds 16 to 40: Sc even at 90 sts (25 rounds, approximately 5.5 inches tall). Rnds 41 to 42: Switch to Christmas red, sc even. [hatband] Switch back to black. Rnd 43: (Sc 14, inc) x6. [96] Rnd 44: (Sc 15, inc) x6. [102] Rnd 45: (Sc 16, inc) x6. [108] Rnd 46: (Sc 17, inc) x6. [114] Rnd 47: (Sc 18, inc) x6. [120] Flat brim complete. Fasten off. Total: 47 rounds.
Holly detail: With forest green, ch 4, sc back along chain, work (hdc, dc, hdc) at the tip to form two small pointed leaves. With red, MC, 4 sc gathered into a small bump for three tiny berries. Sew leaves and berries clustered to the front hatband.
Design 2: Red Santa Hat

Work in Christmas red. MC, Rnd 1: 6 sc. Rnd 2: Inc x6. [12] Then alternate one increase round (sc n, inc) x6 with one even round throughout, working: Rnds 4, 6, 8, 10, 12, 14, 16, 18, 20, 22, 24, 26, 28 as increase rounds, adding 6 sts each time. Even rounds between each one. Continue until Rnd 28 reaches 90 sts and Rnd 29 to 30 are even. The alternating increase-and-even rhythm lets the hat grow tall as well as wide, producing a soft cone approximately 6.5 inches tall.
Rnds 31 to 33: Even at 90 sts. Switch to white. Rnds 34 to 36: Even at 90 sts. Rnd 37: BLO sc for a defined rolled edge. Fasten off. Total: 37 rounds.
Pom-pom: Wrap white yarn around a pom-pom maker until full and dense. Cut, tie tightly, trim to approximately 1.5 to 2 inches in diameter. Sew securely to the narrow tip of the hat.
Design 3: Green Woodland Newsboy Cap

Work in forest green. MC, then increase following the same (sc n, inc) x6 rhythm as Design 1 through Rnd 15, reaching 90 sts. Rnds 16 to 19: Even at 90 sts. Rnd 20: (Sc 13, dec) x6. [84] Switch to burgundy. Rnds 21 to 22: Sc even at 84 sts. Fasten off. Total: 22 rounds, approximately 4.75 to 5 inches tall.
Front brim (worked separately): Ch 10. Row 1: Sc in 2nd ch from hook and each ch. [9] Row 2: Inc at each end. [11] Row 3: Inc at each end. [13] Row 4: Even. Row 5: Dec at each end. [11] Row 6: Dec at each end. [9] Fasten off. Sew the curved edge of this small crescent brim to the front lower edge of the cap, just above the hatband, curving slightly outward.
Holly detail: Same as Design 1. Sew to the side of the cap near the hatband.
Part 9 — Bottom Ornament (Work Only Your Chosen Design)
Design 1: Make a large white pom-pom approximately 3 to 3.5 inches in diameter and attach directly to the bottom tip of the spiral.
Design 2: Attach a short loop of cord or yarn through the loop of a small gold bell and knot securely to the bottom tip of the spiral. Confirm the bell moves and jingles freely but cannot work loose through normal handling or wind.
Design 3: MC in white, Rnd 1: 12 sc, join with sl st. [12] Rnd 2: (Ch 5, sl st back down the chain to firm it, sl st into next 2 sts) rep 6 times, creating 6 evenly spaced radiating points. Fasten off. Lightly steam or starch flat so the 6 points hold their shape. Finished snowflake is approximately 3.5 to 4 inches point to point.
Part 10 — Final Assembly
Thread the core wire assembly through the head from top to bottom so the head sits at the very top of the spinner. Continue threading down through the spine of the spiral so it hangs directly beneath.
Sew the hanging loop securely and centered to the very top of the head.
Sew both branch arms to the sides of the head at the head-to-spiral junction, angled outward and slightly upward. Bend each arm’s wire core into a gentle, natural branch-like curve and angle the small side-twig outward from its twist point.
Sew the top of the spiral to the underside of the head with multiple passes around the join. This connection carries the full weight of the spiral, the ornament, and any wind movement, so work it more firmly than any other join in the pattern.
Wrap the finished scarf around the neck area just below the head and above the arm attachment points. Cross the ends in front and let the fringed tails hang down. Tack with a few small stitches.
Position the hat on top of the head, tilt very slightly if desired, and sew securely around its entire base edge.
Attach the bottom ornament to the very tip of the spiral.
Pull the core wire taut from the hanging loop down to the bottom ornament so everything sits snugly with no slack. Secure with a firm knot or weave the wire end back into the spiral spine. Attach the optional swivel hook to the hanging loop.
Hold the finished spinner up and let it hang freely. The spiral should hang straight with its 10 turns settling into an even corkscrew and the bottom ornament centered directly beneath. Measure total length from the top of the hanging loop to the bottom of the ornament. Target is 38 to 42 inches. Gently reshape any uneven turns by hand now that the wire core holds the correction in place.
Quick Color Reference
| Element | Design 1 Classic | Design 2 Santa | Design 3 Woodland |
|---|---|---|---|
| Spiral main | White | Christmas red | Forest green |
| Spiral edging | Red outer / green spine | Green base + white scallop | Red base + white scallop |
| Scarf | Red and green stripes | Textured forest green | Solid bright red |
| Hat | Black top hat, red band | Red Santa hat, white cuff | Green newsboy, burgundy band |
| Bottom ornament | Large white pom-pom | Gold jingle bell | White snowflake |
Head, face, and arms are identical across all three designs regardless of which snowman you are making.
Care Instructions
Spot clean only. This piece contains stuffing, wire, and (for Design 2) a metal bell that should not be fully submerged or machine washed. If displayed outdoors on a porch or front door, bring indoors during heavy rain or snow to protect the yarn and hardware from prolonged moisture. Store hanging or gently laid flat between seasons so the spiral and hat keep their shape. Keep away from small children and pets if using safety eyes, a jingle bell, or the internal wire.
